Create a file vault on your Mac with secure disk images
This is part 3 of a 3-part series on Mac data security: Perils of persistent data.
* * *
Macs come with all kinds of useful utilities pre-loaded. One of the best is Disk Utility, which lets you do everything from repairing and formatting a hard drive to creating “virtual” drives right on your Macintosh hard drive.
We can take advantage of Disk Utility’s ability to create virtual hard drives for the purpose of making vaults for sensitive data. This is what’s known as a secure disk image.
Secure disk images are ideal for storing sensitive information on your Mac for several reasons:
- They are easy to create.
- They can be password protected.
- They can be secured with 128-bit or 256-bit AES encryption. Highly secure, both.
- They can be any size you want and even automatically expand as more data are added.
- They are portable. The disk image appears as a file on the system. Just drag and drop it onto another disk if you want. You can even email them if small enough.
- When opened, secure disk images look like any other drive in your Finder sidebar, and you can eject them when you’re done to seal the vault again.
The following is a quick tutorial on creating secure disk images.
How to create a secure disk image
Apple’s website has a nice tutorial on creating a secure disk images.
Here’s an even quicker overview:
- Open Disk Utility.
- Click the New Image button.
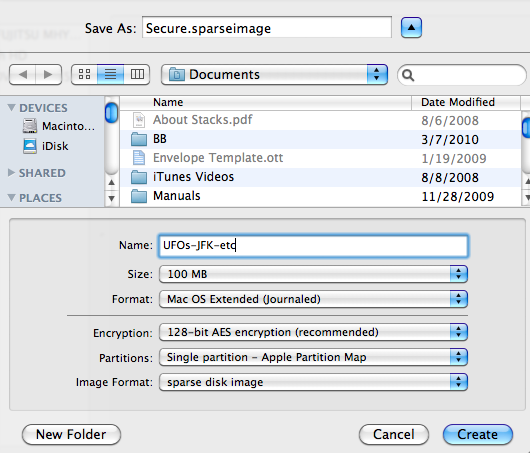
- Fill out the fields in the window that pops up.
In the example below, I’ve chosen to name the image “Secure,” but you could call it anything you want – and save it anywhere you want. Just think of it as a special file.
Here’s an explanation of each field:
- Name: This is the name of the drive that will appear your Finder sidebar when the secure disk image is open. Call it anything you like.
- Size: This is the maximum size the drive can become. Be sure to make it big enough for your needs.
- Format: As long as you’re only planning to use this drive on your Mac, I recommend the Extended (Journaled). If you want to share the image with someone using Windows or Linux, you may want to use a different format.
- Encryption: By selecting either 128-bit or 256-bit here, you’re basically telling Disk Utility to password protect the secure disk image. I recommend 128-bit since it provides plenty of security and runs faster than 256-bit.
- Partitions: Here, you can create multiple partitions within the secure disk image. Single partition will probably be just fine for most uses.
- Image Format: The default here is “read/write disk image,” but I’ve chosen “sparse disk image” instead. A sparse disk image automatically expands as you add more and more data. It will expand up to amount you put in the Size field.
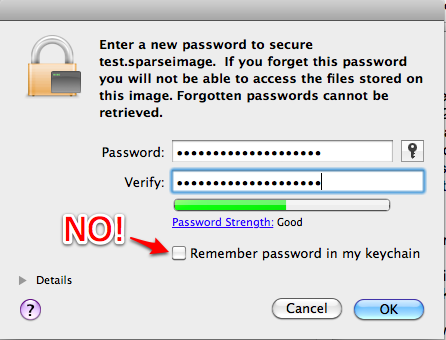
After you click the Create button, you’ll be prompted to enter a password. This is a key step. Your secure disk image is ONLY as secure as your password. Make it a good one. You may want to check out my series on passwords for tips.
By default, the password window will have “Remember password in my keychain” checked. You do NOT want to check this box.
Checking that box defeats the purpose of everything you’ve just gone through. If the password is stored in your Mac keychain, you will never be prompted for it. Anyone who double clicks your secure disk image, will just walk right in.
The only way to secure your data is to put it behind a strong password, but you want to make sure that you will get prompted for it every time.
A few more secure disk image tips:
- You can keep a shortcut to your secure disk image in your Finder sidebar for quick access (mine is called Secure.dmg).
- You should get in the habit of only opening your secure disk images when you need to. I only open mine when I need to put files in or look at files inside. When I’m done, I eject.
A paid alternative to using Disk Utility
Agile Web Solutions, maker of 1Password (my favorite password manager for the Mac) recently acquired the maker of Knox.
Knox costs $34.95 and is designed to streamline the process of making secure disk images on your Mac. It offers several options for organizing information like email, receipts, and anything else you want to hide from prying eyes.
I have not tried Knox myself, but I have a lot of confidence in Agile Web Solutions. 1Password is a brilliant application, and Agile definitely seems dedicated to security solutions for the Mac.
Series recap
This concludes my little mini series on making your Mac more secure. I hope you found it helpful. I'm sure there's a lot I can learn from you too. Let me know.


